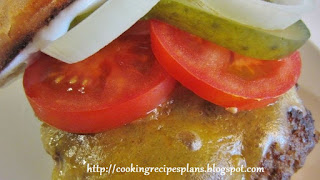
Bronco Burger

Bronco Burger_picture
Bronco Burger

Roasted jalapenos, onion and few secret ingredients make these burgers spicy and irresistible.

Ingredients

- 5 fresh jalapeno peppers 
- 4 pounds ground beef 
- salt and pepper to taste 
- 1 egg 
- 1/4 cup steak sauce 
- 1/4 cup minced white onion 
- 1 teaspoon hot pepper sauce 
- 1 pinch dried oregano 
- 1 tablespoon Worcestershire sauce 
- 1 teaspoon garlic salt 
- 1/4 cup crushed Fritos® corn chips 
- 8 large potato hamburger buns 
- 8 slices pepperjack cheese

Directions

- Preheat a grill for high heat. When the grill is hot, roast the jalapeno peppers until blackened on all sides. Place in a plastic bag to sweat and loosen the blackened skin. Rub the skin off, then seed if desired, and chop.
- In a large bowl, use your hands to mix together the chopped jalapenos, ground beef, salt, pepper, egg, steak sauce, onion, hot pepper sauce, oregano, Worcestershire sauce, garlic salt and Fritos(R). Divide into 8 balls, and flatten into patties.
- Grill patties for 10 to 15 minutes, turning once, or until well done. I always drink one beer, then flip, drink another beer, then remove from the grill and place on buns. Top each one with a slice of pepperjack cheese and pig out!

How To Cook The Best Steak In The World

How_To_Cook_The_Best_Steak_In_The_World_image
How To Cook The Best Steak In The World


Every person likes their steak cooked a different way, so throughout this article I will make sure that I cover each possible different way so that you will always get the best result for yourself or whoever you cook for.

There are several different cuts of beef that will make a great steak, and there are also many grades of beef to consider, depending on what the cow was fed on the farm, so your first step is to choose which one you would prefer. The choices include rump, scotch fillet, porterhouse, eye fillet and T-bone as the main premium cuts generally eaten. The beef's grading will come down largely to marbling and maturity of the meat. There is a debate as to which is better out of grain-fed and grass-fed cattle, and really the answer is grass-fed beef is healthier for you as it is the most natural form of the cattle, while grain-fed beef will have a lot more marbling and flavour, so I will leave that choice up to you which way you want to go. As for maturity, I recommend finding a butcher that will hang your meat for quite a long time in their meat locker before carving it, I have found that 27 days is ideal. This will help tenderize the meat by having it stretched out and relaxing the muscles, to give you the best possible final result.

The rump and porterhouse are firmer cuts, and the rump in particular can be a bit tougher and chewier than the rest, and you will find a strip of fat at the top of each of these steaks, which will help flavour and tenderize the steak during the cooking process. Both these cuts I would recommend eating rare to medium-rare (I will discuss steak doneness a little later).
Meanwhile the scotch fillet will come very nicely marbled with fat throughout, and can usually be distinguished by a C-shaped piece of fat close to one side. Due to the marbling it will be very tender and full of flavour (however if you're on a diet it may be one to avoid for now), and I recommend eating it medium-rare to medium.

The eye fillet is the most tender cut of beef, and will normally be free of fat, although this also means you may need to do something extra to add some flavour to it, the most popular way being to wrap bacon around it during cooking, so the fatty flavours of the bacon are absorbed by the steak. This is my personal favourite steak, and is best eaten medium-rare to medium.
Lastly we come to the T-bone, which has both the eye fillet and porterhouse on either side of the bone, and will get its flavour from the strip of fat on the outside of the porterhouse. I recommend eating the T-bone rare to medium-rare, though it can be tricky to cook evenly due to the bone in the middle.

Once you've decided which cut of steak you will be eating, you need to work out how big a piece of meat you want. A normal-sized steak is generally around 300g for a good-sized meal, however it could range anywhere from 150g up to 1kg and even more! The size of your steak will become important later when you want to cook it to a particular doneness. For example, two different rump steaks could quite easily weigh the same amount, yet be completely different shapes, sometimes they can be wide and flat, and sometimes short and thick, depending on what part of the rump the steak was cut from. Choosing the size of your steak and the shape go hand-in-hand, it's best to have a thicker steak for a rare or medium-rare steak, and when you want a medium-well or above thinner is better. This is so it doesn't take a long time for you to cook, and you can still have a juicy steak without burning the outside.

Now let's just get away from the steak for a minute and think about what you're actually going to cook it on. Ideally you should have a chargrill, one that sits on an angle, and has enough space underneath the flame to have a tray that you can put a small piece of wood on. What I personally prefer is mesquite wood, which comes from the USA, and the best thing to do is to soak it in water for a couple of hours before cooking. This will help the wood give off its smoky flavour rather than just burn away, and it will also last longer, usually for at least a couple of hours.

I mentioned earlier that if possible your grill should be built on an angle, sloping up towards the back. As you know, heat rises, so naturally you should find the hottest part of your grill at the back, and get slightly cooler closer to the front. Most grills and hotplates in general will have certain "hotspots" that you will need to find for each one to work out the bests places to position your food when cooking. Once you've used a particular grill a couple of times you should find it quite easy to figure out your favourite spots to cook on. The combination of knowing where your "hotspots" are and using an angled grill will make it easier to find the best position to cook your steak. If you don't have a chargrill to use and you have a flatgrill or a hotplate instead, I would recommend not cooking your steak entirely through on the hotplate, particularly for medium or above, seal it on both sides then place your steak on a tray and finish it off in an oven. Otherwise all you will do is burn the outside and lose all the moisture and juiciness from your meat.

The other element to consider is how you would like your steak cooked. In general, a well-done steak should be placed at the back, a medium steak in the middle of the grill, and a rare steak at the front. Obviously, this leaves medium-rare between the front and middle, and the medium-well between the middle and the back. In some situations you will need to adjust this slightly depending on the size and shape of your steak, a big, thick rump may need to be pushed a bit further up the grill to cook properly, while a thin and flat porterhouse might be best kept a little closer to the front to avoid overcooking. Your steak positioning will come down largely to personal preference and a bit of practice and experience with your grill.
Now that you should have worked out where on the grill you will place your steak, you're almost ready to start cooking! What you need to consider now is how you will season your steak. You may not want any seasoning, that's fine, go right ahead and start cooking. If you wish to use salt and pepper, I would suggest waiting until one side of your steak has been sealed before sprinkling any on, as salt has the tendency to leech out some of the moisture from your meat. My preferred method of seasoning is to get a really good steak seasoning spice and generously cover both sides before placing your steak on the grill. When you do place your steak on the grill, if you are going to have a rump or a porterhouse, make sure you place the strip of fat at the top, so as it cooks the fat will melt and drip through the steak, adding extra flavour to your meat.

The process of actually cooking your steak is quite simple, but there are a few key things you need to know to get the best result. Firstly, the advantage of using the chargrill means you can have nice cross-markings on your steak when it's finished, which looks fantastic for presentation. To achieve this, your steak will need to be turned three times, the first time straight over itself, then on the second turn spin it around 90 degrees so the lines from the grill will cross over each other and make little brown squares all over the steak, and then the third and final turn will be straight over itself again. When you're finished the steak should have cross-markings on both sides, and you can choose whichever side looks best to serve facing up.

What you should find if you have got the grill positioning right for your preferred doneness, 3-4 minutes in between each turn should have your steak turn out just the way you like it! (If you are cooking your steak bleu, you only need to cook it for 3 minutes on each side in total, just enough to seal each side basically).

This is just a guide to work by only, as each grill will produce slightly different results, but definitely the most important stage of cooking your steak is knowing when it is at the exact doneness you would like. This can sometimes be a little tricky, but there are a couple of methods for testing your steak without needing to cut into it. The best method to use when you're just starting to learn would be what I call the "thumb test". Hold your left hand out open and relaxed, and press the flesh of your left thumb with your right index finger. It should feel quite soft, and this is how a rare steak should feel when you press it with your finger.
Now lightly touch your left thumb to your left index finger, and press the flesh of your thumb with your right index finger. This is how a medium-rare steak should feel when it's ready. Next, lightly touch your left thumb to your left middle finger, and pressing the flesh of your left thumb will feel like a medium steak when it's ready.

Touching your left thumb to your left ring finger will make the flesh of your left thumb feel like a medium-well steak, and touching the left thumb to your left little finger will make the flesh of your thumb feel like a well-done steak. Try this out as a guide to get you started, and as with all things, practice and experience will help you hone your ability and instincts to know just when your steak is cooked to perfection! And just as importantly, make sure you get feedback from every person that you cook a steak for, this will make your progress go much faster. As they say, "feedback is the breakfast of champions!"

Another method to use, which can be a little bit sneaky, is if you can see into the middle of the steak at the edges to see what colour the middle looks like. This works really well for a scotch fillet, as you can gently pull away part of the meat right where the C-shaped piece of fat is without damaging your steak, and see if the inside is red, pink or grey.

Now I will explain to you each doneness, so you can work out how you would like to cook it and so you know what to look for when it is finished.
I will start with bleu, which is basically just sealed, is still very red in the middle, quite mushy to the touch, and will feel a little cool inside, only slightly warmed.

Rare is red in the middle from edge to edge, a little mushy, and will just feel warm inside. Medium-rare is red in the middle and pink at the edges, and will feel warm inside. Medium is pink in the middle from edge to edge, feels tender to the touch, and will be warm to hot inside. Medium-well still has a quarter in the middle that is pink, and will be grey at the edges, feels quite firm and is hot inside. If you plan to cook your steak medium-well or above, I would suggest you could speed up the cooking time by using a steak weight to place on top of your steak. It should be shiny silver and kept clean, and what will happen is the heat coming up from the flames below will be reflected down on to the top of the steak so it cooks on both sides. Make sure if you use a steak weight that you only place it on your steak after sealing one side so there is no chance of cross-contamination.

Well-done steaks are grey throughout, no pink at all, quite firm, although can still be juicy, and is very hot inside. Very well-done steaks are grey throughout with no pink at all, very firm, very hot, and no juices whatsoever. You can also get your steak cooked Pittsburgh, which basically means charring the outside so it is burnt while the inside doesn't need to be completely cooked. For example, if you want to have your steak Pittsburgh-Rare, you could char the outside, and the inside would be red in the middle from edge to edge. To do this you will need some oil or butter, I personally use lemon butter just for the flavouring, and drizzle some over the steak until it drips onto the flames underneath. Your goal here is to build the flames up so they are licking at the steak and will cook the outside much faster than the inside.

CAUTION! Be very mindful of how much butter you use, make sure you have fire safety equipment, and if necessary that you have adult supervision. Do not do this if you do not feel comfortable working with large flames, it can be very dangerous if something nearby catches fire, so please be very careful if this is how you would like to have your steak cooked.
Everybody has different preferences when it comes to their beef, but I would urge you to try each different way so you can work out for yourself what's best for you. Many people fear the sight of blood coming out of their steak, if you can work up the courage to try something new for yourself, who know, you might find you really like it! I personally eat my steaks medium-rare, and would like to take this opportunity to mention that once your steak starts getting to medium-well and above, you really lose a lot of the nutritional benefits of eating beef, so I would recommend not cooking your steak any more than medium, but obviously that is a choice that is entirely up to you.

Now all that's left to do is to serve up your perfectly cooked steak, there are many choices of sides and sauces, far too many to list here. I always love it with a creamy mashed potato and seasonal steamed vegetables, and my favourite sauce is mushroom sauce. If you have the time the best sauce is made using beef bones, cooked off with a little tomato paste, then make a stock by boiling the bones in water with some celery, carrots, onion, leeks, bay leaves and peppercorns. Simmer it for a couple of hours until it reduces about three-quarters, and then remove the bones and vegetables. Add some red wine and port, and reduce it down to about half of where it is now, until it starts to thicken with a nice consistency. From here you can add some sliced mushrooms, or peppercorns if you prefer, and even add a little cream if you like as well. This is very time consuming to make the jus (rich beef gravy), but if you can do it you will find it well worthwhile. One other little tip I have for you is to brush a small amount of lemon butter over your steak before saucing it, this will keep your steak very juicy and tender.

I hope you enjoy cooking and eating many steaks in the future, and make sure you go out and impress your friends with your newfound cooking skills!

Source
Cheesy Ham and Hash Brown Casserole

Guide to make Cheesy Ham and Hash Brown Casserole


Cheesy_Ham_and_Hash_Brown_Casserole_image
Cheesy Ham and Hash Brown Casserole

mostly use this as a breakfast casserole, but it's great anytime. May be served with or without diced ham. Quick and easy to make, not to mention delicious!

Ingredients

- 1 (32 ounce) package frozen hash brown potatoes 
- 8 ounces cooked, diced ham 
- 2 (10.75 ounce) cans condensed cream of potato soup
- 1 (16 ounce) container sour cream 
- 2 cups shredded sharp Cheddar cheese 
- 1 1/2 cups grated Parmesan cheese

Directions

- Preheat oven to 375 degrees F (190 degrees C). Lightly grease a 9x13 inch baking dish.
- In a large bowl, mix hash browns, ham, cream of potato soup, sour cream, and Cheddar cheese. Spread evenly into prepared dish. Sprinkle with Parmesan cheese.
- Bake 1 hour in the preheated oven, or until bubbly and lightly brown. Serve immediately.


Cooking Cabbage

Cooking Cabbage: How to Cook Cabbage


Cooking Cabbage: How to Cook Cabbage

Cabbage is king of cruciferous vegetables in defending the body against illness. Of all foods rated high for cancer prevention, few rank as high as cabbage. While its cancer fighting properties have gained a lot of attention, there are other reasons to make cabbage a mainstay of your diet too. It's low in calories and has almost no sodium or fat, as you would expect. Combined with its high amount of insoluble fiber it's also ideal for those trying to lose weight.

In addition, cabbage is as rich in vitamin C as citrus fruits, with all its protective and healing properties. Just one cup of shredded cabbage will give you two-thirds of the recommended daily allowance of this important vitamin. That's great news because the human body can't store vitamin C so you need to consume it on a daily basis to maintain it in the body. So cabbage can even help combat seasonal colds and flu!

Cabbage Selection

With it's power-packed nutritional benefits and so many savory ways to enjoy it, there's no reason not to find more fun ways to add cabbage to your menu. That said, there are several kinds of cabbage to choose from. We're all familiar with the compact, light green heads that are readily available. Besides those, you can also choose from the slightly sweeter, yet robust and peppery red cabbage; the crinkly leafed, mild flavored Savoy cabbage; and the elongated, celery looking, crunchy Chinese cabbage, also known as bok choy.

Common red and green cabbage have been bred for storage and longevity so they can be enjoyed year-round. The more delicate Savoy cabbage is best during the fall. Bok choy can be bought through January if it looks crisp and fresh. For all types, look for firm heads with bright, crisp leaves that are firmly packed and heavy for their size. Steer clear of heads with wilted, yellowed leaves or those with signs of mold or worm damage.

Storing Cabbage

Red and green cabbage will keep well for two weeks or more in your refrigerator. Wrap the whole head of cabbage in paper towel and store it in a plastic bag, not tightly closed, in the crisper section to preserve the vitamins. Savoy cabbage and bok choy will keep about a week, given the same treatment.

Preparing Raw Cabbage

All cabbage should be washed and the outer leaves trimmed just before use. Trim off and discard the stem end. Cut the core out in a cone shape and discard or grate for slaw (it has a stronger taste). Slice or cut cabbage into thin wedges before washing. Discard any withered or stringy parts. For mildest flavor and tenderness, cut out and discard the fibrous thick ribs from the outer leaves

Grate or shred cabbage raw to use in any number of different varieties of salads or coleslaw. If using a food processor, use the slicing blade to shred cabbage. The shredding blade will cut it too finely. Try combining shredded Savoy cabbage with various kinds of lettuce in tossed green salads. Incorporating red cabbage adds nice color and peppery flavor to salads.

Getting the Odor Out

If you love cabbage but not the odor it emits during cooking here are a couple of suggestions to minimize the characteristic odor. First, when you are cooking cabbage, add a whole English walnut (in its shell) or a celery stalk to the water while you are cooking. Otherwise, choose brief, healthy methods, such as microwaving, or stir-frying, or steaming to cook your cabbage. The smell doubles with cooking times longer than 5 minutes and decreases its anti-cancer properties.

Cooking Methods for Cabbage

New studies seem to indicate that slightly cooked cabbage yields more nutritional power than raw. Bok choy or Chinese cabbage is a natural then to use in stir frys. Green cabbage is very good in a quick saute. Both red and green cabbage are delicious in slow, gentle braises. Try sauteing red cabbage with red cooking apples with a pinch of grated nutmeg and serving with grilled chicken.

My all time favorite way to eat cabbage is to cook it in the microwave with a little water to steam it, just until it's soft - about five minutes. Drain the water and add a pat of butter, plus grated sage and salt and pepper to taste. Delicious!

Cabbage may be common, but it's uncommonly good for you. Your broadest health benefits from cabbage are likely to come from inclusion of all varieties in your diet. With innumerable ways to introduce more cabbage into your diet, why don't you see what you can come up with today.


Cabbage Casserole Recipe

Cabbage Casserole Recipe Plus Tips To Become The Cook You Want To Be


Cabbage_Casserole_Recipe_image
Cabbage Casserole Recipe 

Cooking the same meals every day can become drudgery after you do it for a while. Cooking does not have to be only about eating: you can have a lot of study and possibly an enjoyable hobby. Here are some facts and tips on cooking with cabbage and a cabbage recipe to try for your friends and family. Added are some great cooking guidelines to get you going.

Cabbage is a leafy green biennial, grown as an annual vegetable for its dense-leaved heads. Closely related to other cole crops such as broccoli, cauliflower and brussel sprouts. Cabbage is so diverse and a popular vegetable around the world, especially in Europe, the British Isles and the Mediterranean regions. Of course Cabbage is popular among Americans, especially on St. Patrick's Day every March, when hundreds of millions of heads of cabbage are used in Corned Beef and Cabbage. With slight variations in spices, any Cabbage Recipe can take on a whole new flavor.

Cabbage Casserole is a classic cabbage recipe and a favorite among millions worldwide. Casseroles are generally simple to make and serve as a main dish or heavy appetizer. Try this easy and delicious cabbage recipe.

Cheesy Cabbage Casserole is extra cheesy and delicious.

Cabbage Casserole Recipe Ingredients:


1 medium-size green cabbage, cut into thin wedges
1/2 cup water
1/4 cup butter or margarine
1/4 cup all-purpose flour
2 cups milk
1/2 teaspoon salt
1/4 teaspoon pepper
1 cup shredded cheddar cheese
1/2 cup mayonnaise
3 tablespoons chili sauce
1/2 cup chopped onion
1/2 cup chopped green pepper
Cabbage Casserole Recipe Instructions:

Preheat oven to 375 degrees

Add cabbage wedges with water to large saucepan and cover and cook over medium heat for about 15 minutes to soften the cabbage.

Drain and set cabbage in a large baking dish.

Melt butter in a pan and stir in flour. Stir constantly to smooth butter and flour mixture, then add milk and continue to stir until thick.

Blend in the salt and pepper.

Add mixture over cabbage, and bake at 375 degrees for 20 minutes.

Remove cabbage.

Mix cheese, mayonnaise, chili sauce, onion, and green pepper and place on cabbage.

Bake an additional 20 minutes at 375 degrees.

Let cool a bit before serving.

Cheesy Cabbage Casserole goes well with a fresh tossed salad and bread.

Tips To Help You Become The Cook You Want To Be

Your spices and herbs should be stored in a cool and dark place. If your spices are exposed to moisture, humidity and heat are present, or light they may lose their flavor. Most ground spices will retain their flavor for at least one year. Whole spices can retain their flavors for three to five years.

Your spices should be stored in a place that is cool and cool. Your culinary preparations will be even more delicious if your spices are fresher.

Preparation is one of the most important prior to cooking a meal for loved ones. Gather all of your ingredients beforehand. This process will limit the amount of stress you experience when cooking the meal and help manifest a more positive outcome.

There is something you can do to rescue your hard work and use it as planned. Mix two spoons of water with one tablespoon of cornstarch in a small bowl. Stir the mixture into a warm thin sauce and it will get thicker. Make sure to introduce the sauce from thickening too much.

This will help to maximize the delicious flavors in your food after you are done.

Oil and butter have fat that is often unnecessary. Try using nonstick cooking sprays that will help your food not to stick and works just like oil.

If the recipe calls for water, switch it up by using a broth, beef broth, or cooking liquids. Instead of milk, try sour cream, buttermilk or sour cream. Using different liquids can add a bit of zest to a favorite recipe and even make it more nutritious.

It is important to have sharp knives are always sharp. Dull knives are dangerous to use and difficult to use.

Always properly measure the cooking oil you use. This will help you lower the fat is present in your cooking.This technique gives you to better monitor the amount of oil that you are cooking with.

Leave the bone in a roast when you are pressed for time.Your meat will cook faster because its bone transfer heat to your roaster.

Try putting some cauliflower to your mashed potatoes to cut some calories and fat. The somewhat bland taste of cauliflower helps it to blend seamlessly with the potatoes.Cauliflower has the same texture and color as mashed potatoes, while lowering calories from classic mashed potatoes.

It is vital for all cooks to have their cooking supplies. If they're not organized, you'll be a disaster in the kitchen. Try keeping similar things in proximity to one another. For example, put all your spices together in one cabinet.

Many veggies and herbs give off a scent that remains on cutting board smelly no matter how hard you try to scrub it off. Use a permanent ink to mark one end of the cutting board to identify which side you are using.

Plan to make a large pot of stock in order to freeze it for storing. Good homemade chicken stock is a wonderful base in soups, casseroles, cabbage casserole and more.

Place unripened fruits in a plastic bag that is perforated right after you have poked small holes into. If you put them in the bag with holds the air will go through the bag, the air can circulate and assure that the gas is retained, helping the fruits retain their wonderful taste.

Always begin your cooking with utensils very well before you use them. Any residual food post-washing can ruin whatever you plan on cooking next. This can also spread harmful bacteria to spread.

Oil and butter have fat that is often unnecessary. Try using nonstick cooking sprays that will help your food not contain anything unhealthy and keep it free from fats that contribute little to a healthy lifestyle.

Save about one quarter cup of water after cooking your pasta. When you are getting ready to mix the pasta and sauce together, add this little amount of water to the mix. The addition of the sauce via amalgamation.

Fresh onions emit sulfenic acid when cut and this turns into a sulfurous gas. This gas can leak out and make the salsa taste terrible. Rinsing and drying the raw onions gets rid of the gas.

If the recipe calls for water, you could easily use chicken broth, juice, or cooking liquids. Instead of using milk, you can substitute yogurt, yogurt or buttermilk. Using different liquids can add a bit of zest to a favorite recipe and even make it more nutritious.

A meat thermometer should be used to check that the meats properly.All kinds of meat have a minimum internal temperature that is recommended for safe to eat. Bacteria loves meat and you could ingest it if you do not cook it properly, so you need to make sure the meet is cooked properly and thoroughly so the bacteria don't stay on the meat and cause sickness if you were to consume the meat.

Spices will rapidly lose flavor if exposed to heat, light and humidity. This only exposes the spices to the elements which make them exposed to heat and other unfavorable conditions that zap all of their flavor.

Always make sure you measure your cooking oil! This will help you lower the fat is present in your cooking.This will allow you to better monitor the exact amount of oil you are using.

Fresh herbs and other kinds of natural seasonings can add a kick to the traditional dish. Dried herbs lose flavor as they cook and are fine to use in recipes that are filled with a plethora of flavors. Fresh herbs produce a stronger flavor and can improve the taste of any dish.

Putting the advice you just learned into practice is a great way to get started in an exciting new hobby. Enjoy your time in the kitchen and spend it with loved ones. Older children can be a great help in the kitchen. You may also learn things about yourself when you cook. By enjoying it and having fun with cooking, your meals can start tasting better.


Dill Pickles Salsa

How to make Dill pickles Salsa
Dill_pickles_Salsa_picture
Dill pickles Salsa

Dill pickles are probably my greatest food vice, with a good salsa being a close second. Why not combine them
Ingredients
- 1 (28 ounce) can crushed tomatoes 
- 1 cup diced dill pickles, or more to taste 
- 1/2 cup finely chopped onion 
- 1/4 cup dill pickle juice 
- 1/4 cup chopped fresh cilantro 
- 1 jalapeno pepper, finely chopped 
- 1 lime, juiced
- 1 teaspoon white sugar 
- 1/2 teaspoon salt 
- 1/2 teaspoon red pepper flakes 
- 1/4 teaspoon chili powder 
- 1/4 teaspoon ground cumin 
- 1/4 teaspoon ground black pepper
Directions
- Mix crushed tomatoes, diced dill pickles, chopped onion, dill pickle juice, cilantro, 
jalapeno pepper, lime juice, sugar, salt, red pepper flakes, chili powder, cumin, and black pepper together in a bowl.
- Cover bowl with plastic wrap and refrigerate 24 hours.

Barbequing And Outdoor Cooking Tips

Barbequing_And_Outdoor_Cooking_Tips_image
Barbequing And Outdoor Cooking Tips

When looking for outdoor cooking tips and barbequing, many people aren't sure where to start. Meat might be burned on the outside and raw on the inside, but they can't work out where they are going wrong! So getting a few straight forward outdoor cooking and barbequing tips, you can get your meat safely and tastily cooked and prepare grilled vegetables, or bake bread and wood-fired pizza.

If you have considered building an outdoor barbeque, brick pizza oven or smoker oven, it isn't really that hard and it will undoubtedly improve your outdoor entertaining. Barbequing and outdoor cooking tips will make your social gatherings much better. Although if you are considering any building, you may need designs or plans for outdoor kitchens, brick barbeques or ovens. You can find such things online, but there are a few easy things to consider when you are cooking outdoors:

• Cook larger pieces of meat indirectly, do burgers, steaks or chops on the fast grill. Build your coals on the opposite side of the grill to the meat and close the lid or door. This lets smoke and heat penetrate the meat and slow cooks it, making it ideal for roasts, fish, briskets and ribs, making them more tender and flavorsome

• Cook vegetables indirectly or directly depending on what sort they are, but it doesn't take as long for them to get done, unless they are root veggies which take a little longer

• Burgers, steaks and chops should be cooked by the direct method, but make sure any direct flames have died back. Then put the meat on the grill surface - this seals in juices. So leaving the meat on the same side for a few minutes before turning ensures burgers stay together and meat cuts will be juicy and tender

• Remove meat from the grill when required to be medium-rare, and place it in an indirect heat area for medium-well or well-done steaks. Remember that steaks, burgers and chops are juicier and more tender when cooked to medium-rare because they will continue to cook for a few minutes after being removed from the grill

• Never use forks to take your meat off the grill because this pierces the outside and allows juices to run away, causing dried-out meat

• Try adding marinades and herbs to meats prior to cooking. You can even add more woody herbs directly onto the coals to flavour the smoke, such as rosemary for lamb

Source

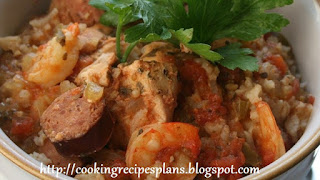
Slow Cooker Jambalaya

Ingredients & direction to make Slow Cooker Jambalaya

Slow_Cooker_Jambalaya
Slow Cooker Jambalaya

This recipe came about from a lot of experimenting over the years. 
My family and friends like this version the best. Serve over cooked rice.

Ingredients

- 1 pound skinless, boneless chicken breast halves - cut into 1 inch cubes 
- 1 pound andouille sausage, sliced 
- 1 (28 ounce) can diced tomatoes with juice 
- 1 large onion, chopped 
- 1 large green bell pepper, chopped 
- 1 cup chopped celery 
- 1 cup chicken broth
- 2 teaspoons dried oregano 
- 2 teaspoons dried parsley 
- 2 teaspoons Cajun seasoning 
- 1 teaspoon cayenne pepper 
- 1/2 teaspoon dried thyme 
- 1 pound frozen cooked shrimp without tails

Directions

- In a slow cooker, mix the chicken, sausage, tomatoes with juice, 
onion, green bell pepper, celery, and broth. Season with oregano, parsley, Cajun seasoning, cayenne pepper, and thyme.
- Cover, and cook 7 to 8 hours on Low, or 3 to 4 hours on High. Stir in the shrimp during the last 30 minutes of cook time.


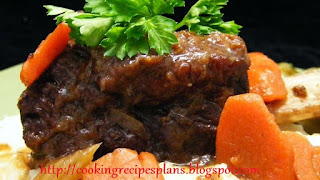
Smothered Beef Short Ribs

How to make Smothered Beef Short Ribs


Smothered_Beef_Short_Ribs
Smothered Beef Short Ribs

Here's a great stove top recipe for cooking beef short ribs. They are cooked in beef stock with mixed vegetables. 
This dish is great served over mashed potatoes.

Ingredients

- 1/2 cup olive oil 
- 4 pounds beef short ribs 
- salt and pepper to taste 
- 1 cup all-purpose flour 
- 2 cups chopped onions 
- 1 cup chopped  
- 1 cup chopped carrots
- 2 tablespoons minced garlic 
- 3 bay leaves 
- 1 tablespoon dried thyme 
- 1 cup red wine 
- 8 cups beef stock 
- 1/4 cup chopped fresh parsley

Directions

- Heat the oil in a large pot over medium high heat. Season the ribs with salt and pepper to taste and dredge them in flour. 
Fry the ribs in the oil in small batches, adding oil as needed, to sear the meat. This should take 2 to 3 minutes per batch.
 Set ribs aside.
- In the same pot, add the onions and saute for 2 minutes. Add the celery and carrots and saute for 1 more minute. 
Season with salt and pepper to taste, and then stir in the garlic, bay leaves and thyme and cook for 1 more minute.
- Deglaze the pot with the red wine, scraping up all the bits on the bottom. Add the stock, bring to a boil, reduce heat to low and simmer. 
Add the ribs and continue to simmer for 2 hours, until the sauce thickens. Stir in the parsley and serve.


Slow Cooker Turkey Chili

Delicious  Slow Cooker Turkey Chili

 Slow_Cooker_Turkey_Chili
 Slow Cooker Turkey Chili

This is an easy chili recipe that you can throw in the slow cooker and forget about all day. Great topped with Cheddar cheese, crushed corn chips, and a dollop of sour cream.

Ingredients

- 1 tablespoon vegetable oil 
- 1 pound ground turkey 
- 2 (10.75 ounce) cans low sodium tomato soup 
- 2 (15 ounce) cans kidney beans, drained 
- 1 (15 ounce) can black beans, drained 
- 1/2 medium onion, chopped 
- 2 tablespoons chili powder
- 1 teaspoon red pepper flakes 
- 1/2 tablespoon garlic powder 
- 1/2 tablespoon ground cumin 
- 1 pinch ground black pepper 
- 1 pinch ground allspice salt to taste

Directions

- Heat the oil in a skillet over medium heat. Place turkey in the skillet, and cook until evenly brown; drain.
- Coat the inside of a slow cooker with cooking spray, and mix in turkey, tomato soup, kidney beans, black beans and onion. 
Season with chili powder, red pepper flakes, garlic powder, cumin, black pepper, allspice and salt.
- Cover, and cook 8 hours on Low or 4 hours on High.


Cabbage Jambalaya

Cabbage_Jambalaya_picture
Cabbage Jambalaya

This is an EASY recipe. My son hates cabbage but will eat this like crazy. 
You can make it low fat by using ground turkey and low fat sausage. They won't know the difference.
Ingredients
- 1 pound ground beef 
- 1 pound smoked sausage, cut into 
- 1/4 inch slices 1 onion, chopped 
- 3 stalks celery 
- 1 clove chopped garlic
- 1 medium head cabbage, chopped 
- 1 (14.5 ounce) can stewed tomatoes 
- 14 1/2 fluid ounces water 
- 1 cup uncooked rice 
- garlic salt to taste
Directions
In a large stock pot over medium high heat, combine ground beef, smoked sausage, onion, celery and garlic. 
Cook until beef is evenly brown. Stir in cabbage, tomatoes, water and rice. Season with garlic salt. 
Bring to a boil, then reduce heat to low. Cover and cook for 35 to 40 minutes, or until rice is done.

Vegetarian Sloppy Joes

 Ingredients & directions to make Vegetarian Sloppy Joes

Vegetarian_Sloppy_Joes_image
Vegetarian Sloppy Joes
This is a combination of many recipes and experimentation. It has gotten the thumbs-up from all who have tried it so far. 
It can also be made with TVP, ground turkey, or even ground beef instead of tempeh.

Ingredients

- 1/4 cup vegetable oil 
- 1/2 cup minced onion 
- 2 (8 ounce) packages tempeh 
- 1/2 cup minced green bell pepper 
- 2 cloves garlic, minced
- 1/4 cup vegetable oil 
- 1/2 cup minced onion 
- 2 (8 ounce) packages tempeh 
- 1/2 cup minced green bell pepper 
- 2 cloves garlic, minced
- 1/4 teaspoon celery seed 
- 1/4 teaspoon ground cumin 
- 1/4 teaspoon salt 
- 1/2 teaspoon ground coriander
- 1/2 teaspoon dried thyme 
- 1/2 teaspoon oregano 
- 1/2 teaspoon paprika 
- 1 pinch ground black pepper hamburger buns

Directons

- Heat oil in a deep, 10-inch skillet over medium-low heat. Cook the onion in the oil until translucent. Crumble the tempeh into the skillet; 
cook and stir until golden brown. Add the green pepper and garlic; cook another 2 to 3 minutes.
- Stir in the tomato sauce, Worcestershire sauce, honey, molasses, cayenne pepper, celery seed, cumin, salt, coriander, 
thyme, oregano, paprika, and black pepper; stir. Simmer another 10 to 15 minutes. Spoon hot onto hamburger buns to serve.


Source

Cooking Tips For Lowering The Fat In Your Diet

Top Cooking Tips For Lowering The Fat In Your Diet


Top_Cooking_Tips_For_Lowering_The_Fat_In_Your_Diet_picture
Top Cooking Tips For Lowering The Fat In Your Diet


Many people are looking for ways to adopt a healthier lifestyle. If you are looking for ways you can eat healthier, cooking at home is definitely a great idea. Of course, even when you are cooking at home, you want to avoid cooking high fat dishes that pack on the pounds. Learning how to lower the fat in your diet is important. Here is a look at the top cooking tips you can use to lower the amount of fat in your diet.

Tip #1 - Start Trimming Your Meats

Before you even start cooking the meat for your meal, take the time to trim those meats, no matter how you plan on cooking it. Work to cut off most of the fat. If you are dealing with meats that have a skin, such as chicken, cut off the skin as well to save big time on calories and fat.

Tip #2 - Avoid Using Fat Drippings

Many people use fat drippings when making sauces of gravies. While this can add flavor, those drippings are high in fat. There are easy ways to make sure you get the flavor without the fat. Let the drippings sit for a few minutes and skim off that fat before using. Another tip is to put a few ice cubes into your stock. The fat will stick to them and you can easily remove the fat.

Tip #3 - Add More Spices and Herbs

Since you are taking out the fat in recipes, which can take out some flavor, make sure you add in more spices and herbs. Fats add flavor, which is why so many people are hooked on fats in their meals. However, using nice spices and herbs such as ginger, chilies, garlic, basil, and others will enhance flavor without the fat.

Tip #4 - Stop Frying

If you want to lower the fat in your diet, one of the best top cooking tips is to stop frying. You will find many other methods of cooking that work well. Poach your food, roast it, broil, or even grill foods. This allows you to prepare tasty dishes without adding more fat. If you need to sauté or lightly fry, use non-stick sprays instead of oils or sauté with wine or stock to avoid having to use any fat.

Tip #5 - Choose Healthier Oils

There are times when you will need to use oils when cooking. When this is the case, choose healthier oils. Instead of using vegetable oils or other unhealthy oils, go with healthier options, such as olive oil or canola oil. Canola and olive oil are unsaturated oils, which means their better for you. Olive oil is also known for containing healthy fatty acids that your body needs.

These are just a few cooking tips that can help you lower the fat you and your family eat. With these tips you will be able to cook healthier meals that everyone will enjoy without compromising flavor.

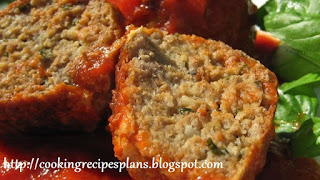
The Best Meatballs

The_Best_Meatballs_image
The Best Meatballs
I never knew how to make good meatballs until I found this recipe. I normally make mine with just ground beef 
and they still taste great. I've used the combination of pork, beef and veal and they are equally good. 
Definitely use fresh bread crumbs and freshly grate your cheese instead of using the canned variety...it really does make a difference.
Ingredients
- 1 pound ground beef 
- 1/2 pound ground veal 
- 1/2 pound ground pork 
- 2 cloves garlic, minced 
- 2 eggs 
- 1 cup freshly grated Romano cheese
- 1 1/2 tablespoons chopped Italian flat leaf parsley 
- salt and ground black pepper to taste 
- 2 cups stale Italian bread, crumbled 
- 1 1/2 cups lukewarm water 
- 1 cup olive oil
Directions
- Combine beef, veal, and pork in a large bowl. Add garlic, eggs, cheese, parsley, salt and pepper.
- Blend bread crumbs into meat mixture. Slowly add the water 1/2 cup at a time. The mixture should be very moist 
but still hold its shape if rolled into meatballs. (I usually use about 1 1/4 cups of water). Shape into meatballs.
- Heat olive oil in a large skillet. Fry meatballs in batches. When the meatball is very brown and slightly crisp remove from the heat and drain on a paper towel.
 (If your mixture is too wet, cover the meatballs while they are cooking so that they hold their shape better.)

Beef Bourguignon Without the Burgundy

How to make Beef Bourguignon Without the Burgundy

Beef_Bourguignon_Without_the_Burgundy_image
Beef Bourguignon Without the Burgundy

This recipe for beef Merlot is one of my favorites, and a take-off on the venerable beef bourguignon,
beef braised in Burgundy wine. Serve over mashed potatoes

Ingredients

- 1 (2 1/2 pound) boneless beef chuck roast, cut into 2-inch cubes
- salt and freshly ground black pepper to taste
- 2 tablespoons vegetable oil
- 1 onion, chopped
- 1 tablespoon butter
- 2 tablespoons flour
- 2 cups Merlot wine
- 2 cups beef broth
- 2 carrots, cut into 1-inch pieces
- 2 stalks celery, cut into 1/2-inch pieces
- 4 sprigs fresh thyme
- 1 bay leaf

Directions

- Generously season beef with salt and pepper.
- Heat oil in a large Dutch oven over high heat. Cook and stir beef cubes in hot oil until browned on all sides,
10 to 15 minutes. Transfer meat to a plate.
- Cook and stir onion, butter, and a pinch of salt in the Dutch oven until onion begins to sweat.
Stir flour into onion mixture; cook and stir until onion starts to soften, 3 to 4 minutes.
- Pour wine into onion mixture; bring to a simmer and cook until wine is reduced by half, about 10 minutes.
Return beef and any accumulated juices to the Dutch oven. Add beef broth, carrots, celery, thyme sprigs, bay leaf, and salt.
Bring to a simmer, cover the pot with a lid, and simmer for 1 1/2 hours on low until meat is almost tender.
- Remove cover from the Dutch oven and simmer uncovered until meat is tender and stew is thick, about 30 minutes more.
Season with salt and pepper.